Showing posts with label condo. Show all posts

Sunday, April 06, 2014

A gallery wall

I am the worst for letting things pile up.  Laundry, dishes, paperwork, home projects, etc.  Thankfully I've matured and now pay all my bills on time.  

So, I am happy to say that we recently checked off our most recent home project from the list: creating a gallery wall in our den.

Over the past few years, Derek and I have been collecting pictures from the different cities we've visited together.  And with the addition of a few gifts from family and friends we had the perfect amount to create our gallery.

But then I needed frames.  And it seemed like a big investment to purchase 10+ frames.  So I sat on the project for another year or so, when finally I mentioned shopping for frames to a friend of mine.

She said "FRAMES?!  I've got frames for days!"  And I went over to her house where she proceeded to pull out 2 large storage bins full of picture frames and I had my pick!  I'm one lucky girl, I tell you.

With no more excuses, and renewed enthusiasm, I started out by framing all of my pictures in the various black frames.  And then I played around to create some type of an arrangement that I liked.  


I have never done a gallery wall, so I found the layout idea below the easiest to work with.  Just create an imaginary horizontal line through the gallery of pictures and then hang the frames above and below the line.  It still has that casual look, but with some symmetry.  


I am super happy with the way it turned out, and I like how the arrangement will allow me to add more pieces as time goes on.  I think some non-frame additions like a a gold W from Chapters would look awesome, for example.


As for tips and tricks on hanging pictures; I've got none.

Basically I measured how long the gallery of pictures would be and tried to leave the same distance open on each side.  I tried to follow some instructions on hanging the frames, but they didn't work.  There are at least 2 nail holes for every picture I hung.  

My friend Lisa would cringe.  

But it doesn't bother me.  They are hidden.  And if they're coming down it's because I'm painting and hanging something new.  They can be fixed at that point.

If you are looking for tips, check these out.  And if you're looking for gallery ideas check out a ton of templates and layout ideas here.

Here are some more detail shots for fun!


The painting is one Derek's uncle did year's ago.  And the kissing orca whale picture was a gift from my sister.


Here's a map of Maui we picked up at a market while on our honeymoon.  


Neither of us have our degrees framed, but my aunt and uncle, Marie-France and Jacques, gave me the personalized picture above which has different buildings from Acadia University and the details of my degree. 

I'm so happy we finally completed this project.  This is the wall that stares back at us every time we open the front door to our home, so the fact that it now has some colour and personality literally makes me giddy.  

Going forward I think I would like to add a sleek floor lamp for reading and a cozy rug with a small ottoman or coffee table.

Sunday, November 03, 2013

Kitchen organizing or "I wonder what's behind the ketchup?"

The other night I had my girlfriend over for a sleepover (true fact: I love sleepovers.)  At one point during the evening, it dawned on me that I needed to share my newly organized laundry closet.  I was so proud of the clean-up I had done a few weeks ago.

Let's just say she wasn't as excited as I was.  For one, the closet isn't much to write home about, as you can see here:


I tried to explain how bad it had been (and it was bad), but she said that she figured it had always been organized. She never would have thought differently.

I guess that's the beauty of closed doors.  Even though I know the disaster that lays behind them, my guests have no clue.

I've been slowly gaining motivation to organize different areas in our home.  Most recently I tackled 2 of our kitchen cupboards.

Here is what I started with:


Let's get a little closer shall we...


And we can't forget the upper cabinet.


So these 2 cupboards basically make up my pantry.  I just got used to pulling out the few items that were in the front, and then balancing them on top of the mess when I put them away.  I had no idea what was even in the backs of my cupboards. So bad.  Makes me cringe.  

First step to organizing...make another mess!


I tried to sort food as I removed it from the cupboards.  My main piles were breakfast food, snacks, canned/bottled food, baking items and carbs (quinoa/rice/pasta/beans).  

During this process I realized I had doubles of several types of food - both of which were opened.  Food I didn't even know I had.  This is the cycle that unorganized cupboards cause.  You end up buying things you already have thus creating more clutter.  You also waste money.

Since my "pantry" isn't very user friendly I tried to add some functionality to the space, and the first group of food I tackled was the baking items.  Who knew I had all these baking ingredients?  I didn't!  Maybe I'll actually try baking something now...


I had this cute little striped canvas basket that was actually storing Derek's CDs.  I think the CDs are at least 10 years old and we need to host a throw back party.  DJ Derek can provide the jams.

I was able to coral all my baking supplies here, keeping them together - perfect!


Next step...get all those carbs together.  The carbs that will be feeding us through to the spring I might add.

The cupboards are pretty deep (which is nice!)  However it makes it difficult to get to the items in the back.  Enter this cute wooden crate my mom bought me.


I even lined it with some pretty napkins I had on hand.


I stuffed all that food in there so that it's easy to just pull it out from the back.  


For the upper cabinets I just tried my best to just keep like items together.


I had an extra tin which I used to store things like chia seeds, flax seeds, nuts, and oatmeal which I use to make my new favourite breakfast: overnight oats.  


In the end, it was pretty great because I actually gained (almost) one whole empty shelf!


My baking supplies along with a basket of tea towels and dish cloths are stored on the microwave cart right beside the kitchen.

*side note: I've since tossed the dirty flower water and actually changed the Christmas art that has been hanging since December, 2012.*

This whole process took about an hour and a half and I'm so happy I finally took the time to do it.  It also felt as though I was going shopping in my own kitchen.  I honestly had no idea I had all this food.  I'm hoping the systems I've put in place are easy to maintain and that my cupboards continue looking this way.

Next up...the front hallway closet.  Which isn't actually too bad, and has some good storage and organization systems going on, but just needs a refresher.


And because who doesn't want to look at beautifully designed and organized spaces, here's some inspiration I have for some areas of our home.

I love the shelving and lighting this closet offers.  The shelves are pretty bare, but some baskets and clear containers are all I would need to organize our laundry closet.


This type of industrial shelving would work well as an alternative to customized wooden built-ins which are what I'm really dreaming of for the laundry closet.


Using the door (and vertical space) is always such a great idea.  I've never done anything like this.  I'm always worried about the caddie not being secured properly and having it bang around.  I also love the idea of painting (or wallpapering) the inside of the door.


What are your organizing tips?  I'm always looking for great storage solutions for small spaces!

Tuesday, March 05, 2013

Pinterest challenge complete!


First of all, I apologize that I am one day late posting my project.  To be honest, the project was complete on time, but the uploading of the images/writing of this post just didn't seem to happen.  Ooops!

So, as you know, I was in love with beautifully styled medicine cabinets and pinned a few as eye candy.  I took it as a sign when Sherry and Katie announced the winter edition of the Pinterest Challenge to get my butt in gear and beautify my own medicine cabinet.

And so I did!  And it was so easy!  And cheap!

Here is what I was working with.  Our teeeeeny tiny bathroom with zero counter space, but thankfully a handy built-in medicine cabinet.


As you can see, the contents of this cabinet are not pretty, organized, bright, happy, inspiring or anything really!  It could only get better from here.


My game plan was to ensure we only had things in our medicine cabinet that were used on a daily basis.  And of course, I tried to make sure things looked good.

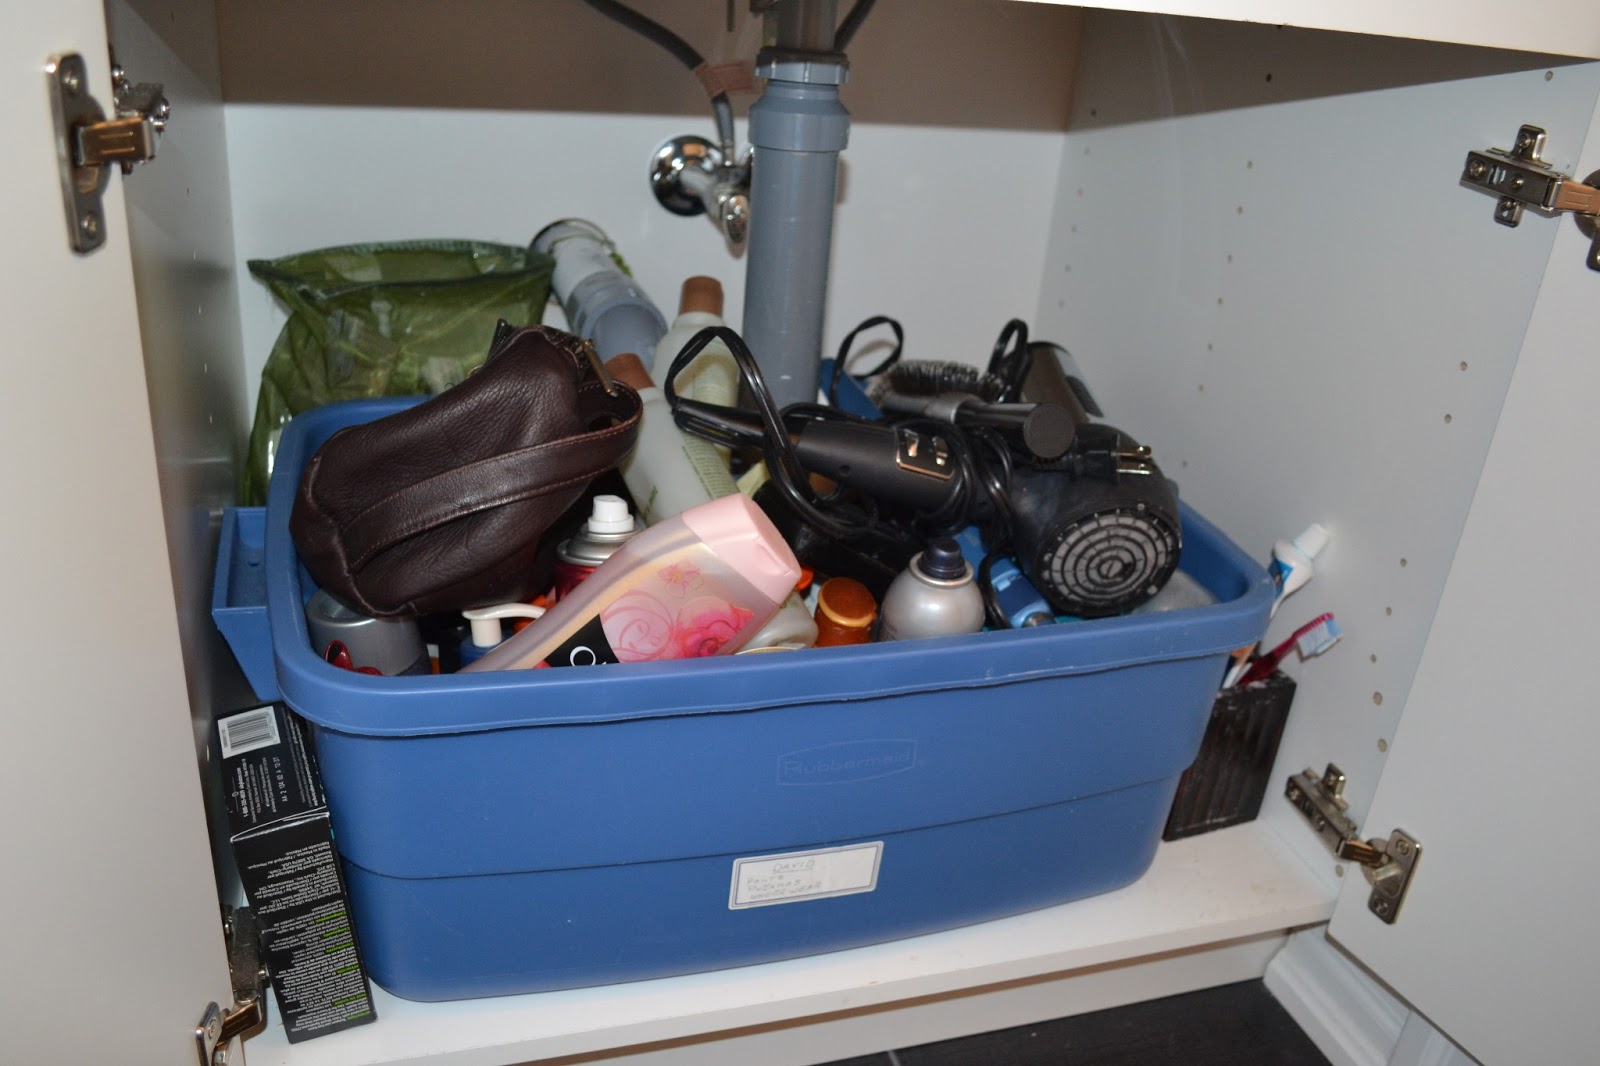
As I got going, I didn't feel right ignoring under the sink.  Which was actually in way worse shape.


All I can say is Yikes!  We basically packed up our bathroom supplies in that bin when we moved and then just shoved it under the sink to be ignored.  

I got started by pulling everything out and organizing things into groups.


I purged duplicate items, almost empty bottles, and expired drugs.  I had so many hair products that I NEVER use. 


Now before I started this project I did take a trip to Dollarama and made some great purchases, all for under $15.  


Before hitting up Dollarama at Train Yard's, I stopped into the Solutions store which is basically an organizer's heaven.  They were selling drawer dividers like the ones above starting at $8.  I couldn't believe it.  So I left, saddened, but then walked into Dollarama which is right next door and found basically the exact same things for 99% less.  Craziness.  

Oh, and I made some labels too.


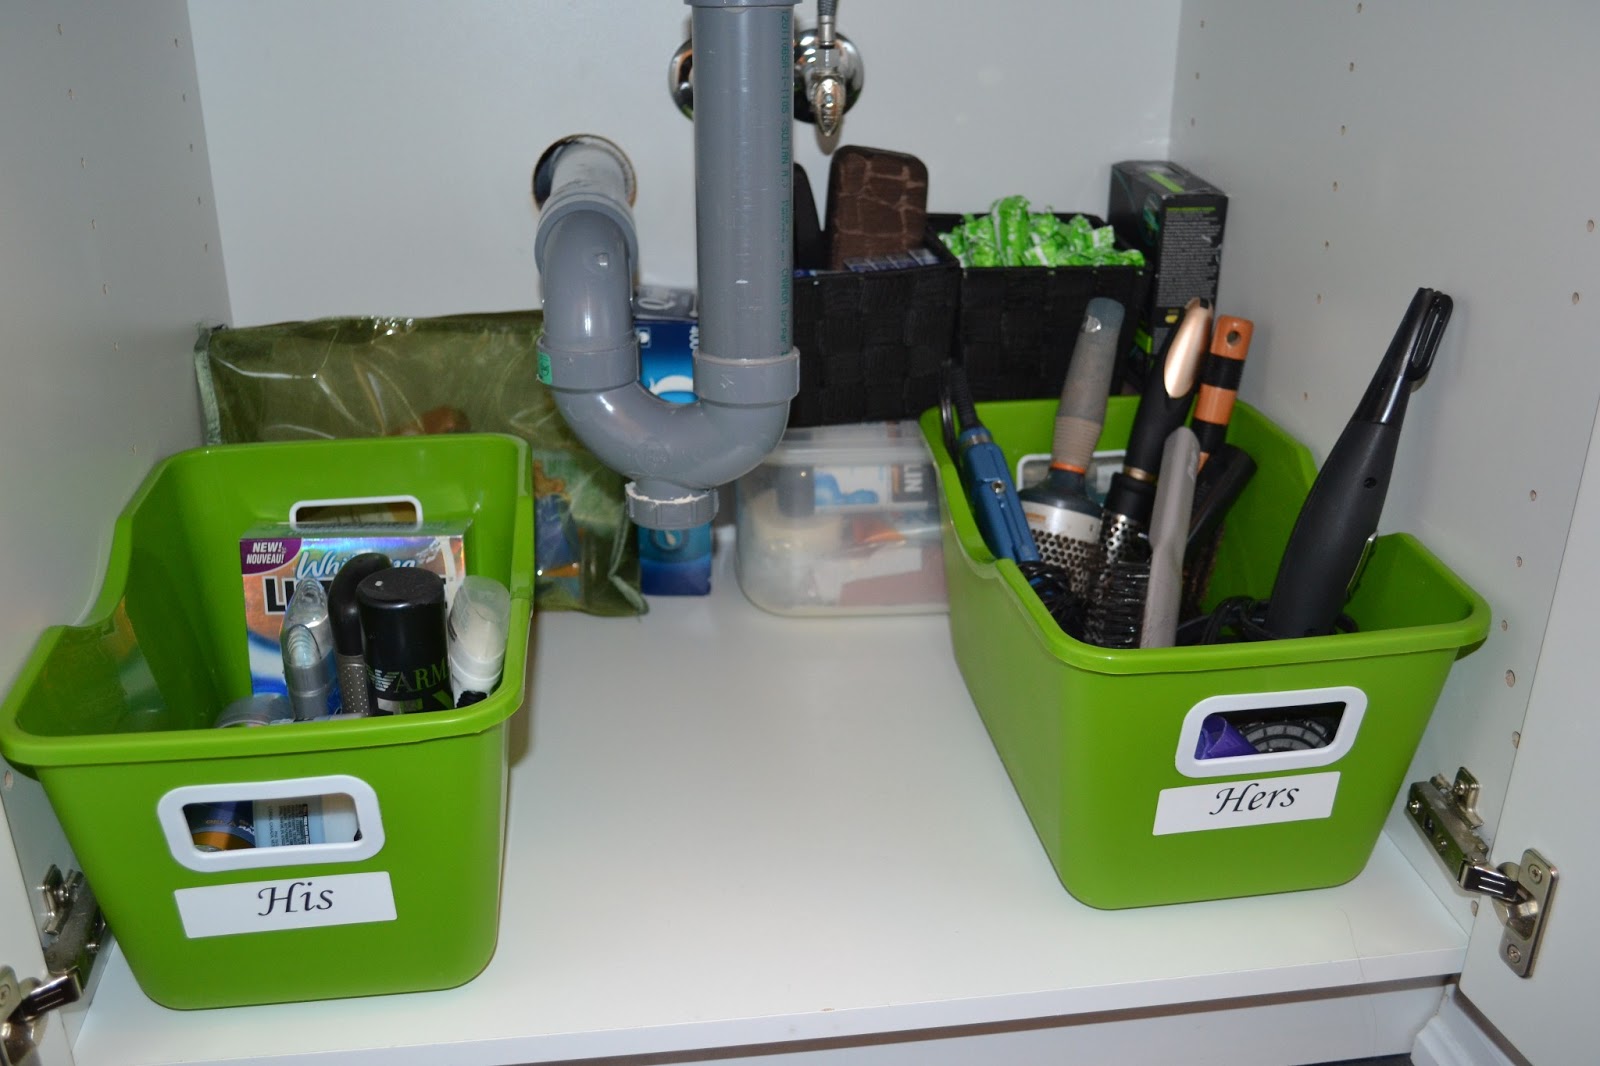
In the back of our cabinet I organized a first aid kit, my "feminine hygiene products" (ps - isn't that the worst term?  Let's just say it, they are TAMPONS!)  There is also a little basket for Derek's year-long supply of contact lenses and glasses cases.


The green bag in the back contains our summer essentials (sunscreens and bug spray).  But what I'm really excited about is the HIS and HERS baskets.  It is so much easier to stay organized!


In the middle goes all those extras (soap, creams, bubble bath, hair products) - basically another, larger, HERS basket.

Eventually I would like to incorporate a shelving system, but for now this is a HUGE improvement!

I realize I've gotten off track with the under the sink madness, but I just wanted to save the best for last!  So after organizing everything and sticking labels on obvious containers I was ready to beautify the medicine cabinet.

I went to Michael's and purchased 4 sheets of scrap booking paper and some sticky tack.  Then I simply tacked it up against the back of the cabinet.  I didn't even use a ruler, take down the shelves or measure a thing.  And it took less than 10 minutes.  

Tada!  I think it may have been beginner's luck.  But I'll take it!


I'm not going to lie.  When I was finished putting up the paper I squealed with delight and stared at it for a good 5 minutes.


Then came to returning our items to their home.  


I must say, I'm super happy with the final result, and absolutely LOVE the paper I chose!  I am hoping to move forward with the rest of the bathroom design with that colour/pattern in mind.  


Just in case we didn't know where to put our teeth care products back, I thought a label would help.  Half of me thinks labels are hilarious and unnecessary and the other half is obsessed.


There you have it!  My Pinterest challenge complete, and something to cross off our list of showing our home some love!  Feels good!

Did any of you participate in the Pinterest Challenge?  If so, what did you do?  And what about your bathroom storage situations?  Our's was pretty bad, but I find having pretty containers and labels motivates me to keep things organized.  Not to say that I don't get lazy, but I think the key is to make sure your organization systems are user friendly and to not be afraid to change them up as you grow and change.

Now onto the next area of our home.  I am hoping it's the light above our dining table.  And I will be looking to you for advice!  

Friday, February 15, 2013

Showing our home some love

The title of this post was inspired by non other than Young House Love's book that my sister gave me for Christmas.


Now that our wedding is a lovely memory I day dream about almost daily (totally true), I am excited about putting some of our extra time and money towards other areas of our life.  Yes, Derek, don't worry - that includes saving and paying off debt if you are reading...

If it was up to me I would put all of our disposable time and income towards decorating our condo.  I’m pretty obsessed with moving things forward, but just can’t seem to find the time or energy.  Well and the obvious big kicker, the budget.  Anyone with me?  

The money part is not going to stop me from getting started on my plans though, since there are a lot of things I think we can do for little money or even free!  (i.e. organize the closet, purge clothing, hang art work we already own...)

One of the reasons I love my blog is that I can treat it like a diary and write down my plans and goals.  And they say that if you write things down you are more likely to accomplish them.  They also say that sharing your goals with others is a good way to put the pressure on.

Bonus: creating a list means you get to cross things off!  Crossing things off a list is like my favourite thing in the world.  Sometimes I write lists of things I’ve already completed just so that I can cross them off.  I knnow that is sort of cheating, but whatever.  Makes my heart sing.

So here it is, a breakdown down of what I would to love to accomplish in each room of the condo.  The list is long and will probably evolve over time, but at least I will have put the first draft out there.  I've also included an estimated budget for each item.  I have no idea if this is accurate, but it will at least give us something to work from.

I've also included some inspiration photos so you can see where my head's at!

Bedroom


I am very happy with the bedroom furniture that we have (it’s the pieces we are missing that bothers me).  I have a vision for this room that includes moody gray walls, with purple and dark wooden accents. 
  • Walls: choose paint colour and decide whether or not to do an accent wall behind the bed (I’m thinking stencil, wall paper, or grass cloth). ($250 for supplies if we paint ourselves)


  • Clothing storage: we need to organize our closet, purge items and purchase a dresser for the room.  This may be a top priority, as I’m starting to go bananas from our disorganization.  I’m thinking something tall and slim for the corner of the room where our mirror currently leans.  ($300)
  • Lighting: we have a ceiling outlet without a fixture.  I would love to find something soft and romantic with a dimmer, mostly for mood lighting.  I am totally in love with capiz chandeliers. ($100)
  • Artwork: there is nothing on our walls.  I would love to have a few of our wedding photos blown up for above the bed and then go from there. ($150)
Total budget: $800

Bathroom

Firstly, the bathroom is pretty tiny and there is no counter space.  Any impact that is going to made must come from the wall colour or shower curtain – there is hardly room for artwork or accessories!
  • We need a new, longer shower curtain that doesn’t make our shower look like it’s wearing Steve Urkel pants. ($30)
  • I don’t like the placement of the towel bar which is above the toilet and would like to remove it.  I think we can hang a few hooks behind the door as a replacement. ($15)
  • Under the sink: well this is kind of a disaster.  I need to figure out an inexpensive way to organize our toiletries. ($20)

  • Medicine Cabinet: I love that we have a built in medicine cabinet and I am totally inspired by these photos.  I want to make it pretty, colourful and organized in there so that it puts a smile on my face every time I open the door. ($15)
  • Colour: because I’m not ready to paint yet, I’m going to try and add some colour through hand towels and maybe some art. ($40)
Total budget: $120


Kitchen

I’m pretty happy with how the kitchen functions.  With our book case on the opposite wall I feel as though we have ample storage.  We do however have extra items that are never used and take up precious space.  This calls for a de-clutter.
  • Stools: we would love to have some stools for our island; we just need to find the time to hunt for them! ($200)
  • Accent Wall: I would love to do something with our little wall at the end of the island.  Chalkboard paint, a bold colour, wall paper? ($40)
  • Shelving: I think some shelves on the kitchen side of the accent wall will add interest and storage.  I like the industrial look, and these IKEA shelves. ($60)

Total budget: $300

Living/Dining Room

This is where we spend the majority of our time.  The good news is that we love the big pieces of furniture we already have and are just missing a couple items. 
  • TV Situation: I believe I’ve mentioned before that the TV set-up is temporary.  In my dreams that wall would house a midcentury modern console, adding a warm wood tone to our space while hiding away all those pesky wires.  ($500)


  • Walls: we like them white for now, but maybe one day a soft gray would be nice. (no idea?  This is a ways away)
  • Artwork: we love our California collage above Cedric, but now that our new table has finally arrived it needs some love too.  We can’t decide what to do, but thought a wood framed mirror would like nice. ($100)
  • Lighting: our floor lamp is awesome, but we still have a ceiling outlet above our dining table that needs a chandelier.  We have a few gift certificates from ZONE that have added up over the past few months so we thing there would be a great place to start looking and so far I've found one I really like. ($150) 


  • Area rug: I want one bad!  Not only to ground the space, but to add some comfort and softness to the room.  I love how a Persian rug looks in a modern space, but I don't know if Derek is sold. ($300)

  • Curtains: I can’t decide if I want to hang panels just to soften the space and add colour/pattern. ($100)
Total budget: $1260

Den

I really need some inspiration for this room.  Its main use is to hold junk and our laundry.  It is where our friends sleep when they stay over and our future plan is make it a (very small) nursery with built-in storage.
  • Artwork: my goal is to create a gallery wall above our futon by spring!  I have almost everything I need; I just need to get my act together.  YHL actually just posted a tutorial on how they hung a gallery wall, so I think I’ll follow that. ($50, mostly for the frames)


Total budget: $50

Entrance

We don’t have much of an entrance, but that doesn’t mean we can’t create impact in this small space (along with some organization).

  • Closet: this is a huge closet, and although it’s not terrible right now, I think we can purge some things.  I would love some pretty, matching baskets with labels too J (free)
  • Bench: a place to sit when we put on our shoes and also act as a semi divider for the den would be nice.  If it included storage – bonus! ($150)
  • Entry table: we have a little guy who has been serving us well.  We’ve got a spot for our keys and loose change, but I would love to get some drawer dividers and add a mirror on the wall above it. ($15)

Total budget $165

Balcony

This is a small space that won’t take much to spruce up, but once the warmer weather hits I do want to make good use of this extra square footage.
  • Outdoor rug: we had one at our old place and loved the pop of colour it added! ($75)
  • Plants: I would like a tall palm plant of some sort along with some flowers boxes. ($50)
  • Storage box: I keep my soccer bag on the balcony in the summer time – it would be good to have a storage box to hide it (along with any other random sports equipment) away in. ($30)
Total budget: $155

Woah, things add up quickly, eh!?  Almost $3000 for all the little improvements I would like to make.  If we put away about $170/month over a year and a half I will have enough money to do everything on my list.  So, maybe I will make that a goal: save a little bit each month, and work away as the time goes by, beginning with the smaller things first, while saving for more expensive changes.

You heard it here folks: Meaghan has put together a budget!

So, how do you guys do it?  See a piece of furniture you love, put it on your credit card and pay later?  Or do you save your pennies until you have enough to pay in full?  It can be hard to wait sometimes, especially if you see something you LOVE!  But then it can be hard to justify large purchases too.  Especially since we haven't saved up for other priorities like an "emergency fund" (I had no idea this was supposed to equal approximately 3 months salary).  Not to worry - we will get there!

The Great Glebe Garage Sale is coming up in the spring and this year I will definitely be creating a detailed list and taking the shopping very seriously.  Derek - be warned!  

My goal is to tackle the bathroom organization first.  I actually stopped at the dollar store and picked up some storage containers that I love.  I can't wait to share that with you!

Happy Friday everyone!